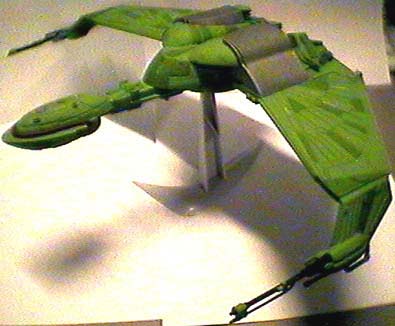
Klingon Bird of Prey Review
History:
I have been a fan of Star Trek since 1987, the first airing of Encounter at Farpoint. This Bird of Prey ship had a fairly significant part in Star Trek IV: The Voyage Home, one of my favorite movies on the series. I found this kit at Toys 'R' Us at half off retail, so I thought I should pick it up.
Build:
This was the easiest part for me to do. For sanding and filling, I puttied every joint when they were put together in modules of two or three parts. The gaps were extremely easy to fill and sand, with planning, there was no need to worry about having to sand in difficult crevices. For painting, I put this kit together into modules, the two wing tips, the two wings and the central hull.
Paints:
There are four significant colors used on this model, the others were mostly detail colors. Although I am not an advanced modeller, I do have access to an airbrush, and I used it for the base color. For your convenience, I'll list the colors here.
Major Colors
Pale Green - FS 34227 - I used about 25 ml, but I sprayed this color on heavily and had a large amount of overspray and paint lost adjusting the airbrush.
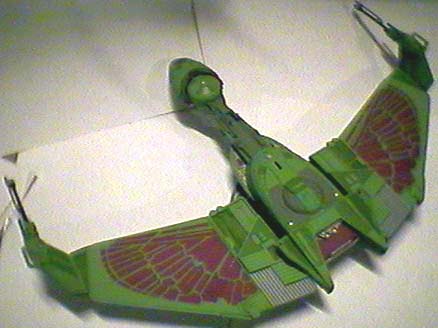
Green Zinc Chromate - Model Master # 1734 - about 1 ml used, this is a significant detail color, as many panels are colored using this
Insignia Red - FS 31136 - I used about 1 ml, nearly half of the under wings are to be painted this color.
Steel - I used about 1 ml. For proper appearance, try to get this color rather than skimp and use silver, as model paint silvers would be too bright for this task.
Minor Colors
Rust / Brown - lots of small details
Yellow - engine section
White - small markers and the engine section
Light Ghost Gray - FS 36375 - the tail edge of the wings and some small details use this color.
Black - they also call out a color called gunmetal, but in looking at the Deutsch section of the color chart, black would seem to suffice, as both are translated as schwartz, the German word for black. I bought gunmetal myself, but the color is dark enough in its application that it did not matter.
It would appear that AMT/Ertl's people used the closest matches in Testor's Model Master pain line, even calling out the number 1734 for a color, which is MM's stock number for the color Green Zinc Chromate. Presently, I am dissapointed with Testor's paints in the point that the thickness, fluid level and color opacity varies from bottle to bottle and color to color far too much. Personally, I doubt these colors are accurate to the Bird of Prey in the Star Trek movies and series, but few people are this picky. I have sprayed a final dull coat to get eveything into a reasonably consistent sheen, I wanted to as my touch-up areas were distinguishable from the air brushed paint mostly by glossiness. After the dull coat was applied, the model looked outstanding. I had some minor places where I couldn't get the paint to go on correctly, but most people won't notice.
Weathering:
I have not yet done any weathering effect on this model. In my opinion, the wethering shown on the box is extreme, unless the 'bird' was very old, as these ships are typically in space, so the main wethering would be battle damage.
Decals:
The number of decals that are intended for this kit is four, they were placed on a sheet about three by four centimeters in size. I tried to apply one at the outer wing tip, but I ripped the tip of it trying to get it to conform to the ridges and grooves. I have not applied the others yet, but this does not seem important as the decals are quite small.
Display Stand:
A large clear acrylic disc with a slot cut out for a wing, plus a black rubber base were provided. Be careful with the disc, as it can crack easily. Do not remove the protective paper until you are ready to display the model, as fingerprints and scraches show up quite easily. Another display stand is included, molded in white plastic. I like it a little better, but it is quite a bit less stable. As long as you have a threatening weapon when people say 'ooh', 'ahh', it shouldn't matter. It is also less damaging to the paint as it fits right where it was designed to.
Conclusion:
This was an enjoyable project, it was not very difficult to achieve a nice looking model when completed. The parts were well detailed, joints and cracks were easy to fix, and the relief in the plastic made detail painting very easy.
All trademark and copyrights are property of their respective
owners. All original material here ©1999 Jeff DeMaagd.
My Main site
This page has not been officially reviewed by the ISP, and they cannot be held responsible for anything I do.